I decided it was time to put to use the 4 flip video cameras our school purchased last year. They have been sitting in out Technology Specialist's office. I ran across a neat idea this summer while exploring various websites. Students work in groups to create a Common Craft video explaining the reason for the seasons. What a great project I thought. So now I am knee deep in it, and feeling my way through the dark as I go. My students are so excited about the project...I am, well, not sure of the best way to go about this. I am learning just as much, and perhaps more than my students.
Here is where we are right now. The project has been introduced (I showed the YouTube video I saw this summer.) I divided the students into groups. I like working with groups of 3 - everyone seems to have a job and no one has excess time on their hands.
Together as a class we developed a rubric for the content and then a rubric for the video itself. I was so impressed at what they came up with. We are working on writing our scripts and making our props. Stay tuned for updates.
Tuesday, October 12, 2010
Saturday, September 11, 2010
Embedding Glogster in Wikispaces
I was so thrilled to see that Glogster and Wikispaces had teamed up and Wikispaces now has a very convenient poster widget to easily embed a Glog. I had spent hours reading on the internet how to change the size of my Glog to fit in the area of Wikispaces pages. This poster widget was the short cut I was hoping for.....or not.
I was disappointed when I tried this new feature. I like for my Glog to take up the entire space in the page on my Wiki homepage. When I used the poster widget it shrunk my Glog too much for my liking.
So, I am back to doing the math to adjust the scale in the embed code correctly so my Glog fits the page width. To help me in the future and to anyone else from spending hours trying to figure it out. Here is what you need to do.
1. Copy the embed code from you Glogster page.
2. Paste that code into the "other html" widget when you edit your wikipage.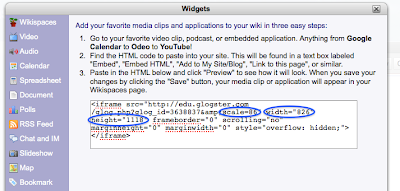
3. The trick is to change the scale from scale=100 to scale=86.
Then you also need to change the width to = 826 and the height to = 1118.
This will embed your Glog to fullest size possible on a Wikispaces page. Check out my class wiki to see.
I was disappointed when I tried this new feature. I like for my Glog to take up the entire space in the page on my Wiki homepage. When I used the poster widget it shrunk my Glog too much for my liking.
So, I am back to doing the math to adjust the scale in the embed code correctly so my Glog fits the page width. To help me in the future and to anyone else from spending hours trying to figure it out. Here is what you need to do.
1. Copy the embed code from you Glogster page.
2. Paste that code into the "other html" widget when you edit your wikipage.

3. The trick is to change the scale from scale=100 to scale=86.
Then you also need to change the width to = 826 and the height to = 1118.
This will embed your Glog to fullest size possible on a Wikispaces page. Check out my class wiki to see.
Sunday, August 29, 2010
Saving a Wordle
I have been trying to figure out how to save a Wordle on a PC so my students can upload it to Glogster or their wiki page. I finally have it!
1. Use the print screen button to take a screen shot. (Press the print screen button once)
2. Open Paint and click edit paste to insert the screen shot into Paint.
3. Use the dotted rectangle crop tool in paint to capture just the Wordle.
4. Click edit - copy.
5. Open a new Paint document.
6. Click edit paste.
Now..you now have an image of just the Wordle.
7. Save the image as a jpeg.
Now you can upload this to a wiki or to Glogster.
I did this on the second day of school with my students. All 29 of them and me in the computer lab, and it worked just fine. I will post the directions on our class wiki so they have them for reference the next time they wish to save their Wordles.
Sunday, August 22, 2010
Wikispaces vs PBWorks
Last year I started my journey using a wiki with my students. I set up the wiki using PBworks. It worked fine and I enjoyed using it. My district prefers that we use Wikispaces. So I have spent some time comparing the two. I like the clean organized look of Wikispaces. (point for Wikispaces) PBworks allows me to customize student username to actually be the students name...point for PBworks. There are slight differences in editing, but it takes only a short time to get used to how to navigate Wikispaces. The determining factor is going to come down to discussion forums. I am really looking for the ability to have a forum discussion on our novel studies. PBworks does not have this feature, and Wikispaces does. So, I think that I will venture out and use Wikispaces this year with my students. I will keep you posted along the way.
msblaszak.wikispaces.com
msblaszak.wikispaces.com
Tuesday, August 3, 2010
FakeBook

What a neat idea. I learned about this project idea from my friends on Twitter when they asked, "What would Romeo's FaceBook page look like?" My interest was peaked. I clicked on the link to find a project any middle school or high school student is sure to enjoy. Thank you David at Tomorrow's Tech in Todays Schools blog for posting this resource.
Download the PPT template and the project directions here.
Monday, August 2, 2010
Wordle
 A wordle is a graphic representation of the most frequently used words in a blog, free write, or speech.
I have found that it is much easier for students to use the advance technique for entering words on their own. I have students type the list in a Word document first, and then copy and paste into the Wordle text box.
Another great idea is to have students try to guess the Wordle of the Day. Here is the link to get the Wordle of the day: http://jenuinetech.com/GTW/. Thank you Jennifer Wagner for putting this site together and generating the Wordles.
Blabberize

Blabberize is a site that allows users to upload a picture and make it talk.
The process to sign up takes about two seconds, no e-mail verification is needed. After you log in, you will be taken to your own page. You will have nothing in your page the first time you visit. To create a product select “make” at the top of the page. You will be asked to upload a photo.
The next step is to position and shape the mouth onto your photo. This is the part that will move as if the mouth opens and closes with the voice you record later on. Simply reposition the dots by clicking and dragging them into position.
Next you will be asked to add a recording. You can talk into the microphone on your computer, add an audio file or select the option to phone the audio in. Blabberize will provide you with a phone number and extension that matches your photo.
Next, hit save. You will be asked to name your creation, write a short description, and add a few tags. Congratulations - you have created your first talking photo.
VoiceThread

A VoiceThread is an interactive media album that are online slide shows of images, documents, or videos. Viewers are able comment on any slide by typing, recording an audio or video comment, or drawing on the image itself. VoiceThread has amazing video tutorials that walk users through each step of setting of an account to explaining each way to comment on a thread.
Teachers can sign up for a free account, however it looks like you only get to create three threads on this account. Your students sign in under your account. They simply upload an avatar to accompany their identity.
If you like, you can pay for an educator account. The cost is $60 per year and you can add up to 100 students.
Here are links to some great examples using VoiceThread in the classroom:
Students Sharing Poetry (set up with no comments can be added option)
Water Cycle Review and Assessment
Writing Revisions - Small Moment
Triangle Scavenger Hunt
I am looking forward to trying Voicethread out with my students this year.
Animoto
I love, love, love Animoto! Users simply upload digital images, arrange, add some text and music and before you know it Animoto has mixed a professional looking movie for you. Teachers can register for an education account (click on Education in the bottom right corner). Be aware it does take a while for the account to come through. I think I waited two weeks last year at the beginning of the school year.
Once you have your account, students need to register within about 30 days. You educator account is good for 6 months, however your access code is only valid for 30 days.
Students do need to have an email account to register. I created an account in Gmail. Gmail allows you to add + name to the email username. I registered blaszakstudent@gmail.com as my email, now each student uses this as the basis but adds their name. For example blaszakstudent+amy@gmail.com. The email still comes to my original account. I maintain control.
My students enjoyed using Animoto to create a final novel project for Roll of Thunder, Hear My Cry. To allow for more text and for text on a page with a picture, students created the "slides" in PowerPoint and we saved these as pictures to upload to Animoto. We learned that one or two sentences was all we should put on a page. It became to hard to read otherwise. Students also learned about choosing text size and color that could be easily read.
I often create quick videos from pictures I have taken in class and email the link to parents. It gives them a glimpse into what we are doing during the day.
Wednesday, July 28, 2010
Glogster
 Glogster is a wonderful creativity tool that allows students to demonstrate their knowledge. Glogster allows users to input text, pictures, graphics, video, and audio to create an interactive online poster. Glogs can be hosted by Glogster or you can embed it into a wiki, blog, or class web site.
Teachers must register to use Glogster. It is free, and each student will have a log in. You can have up to 100 students in your account and from the teacher dashboard you can view and control all student activity.
Here are some great examples of glogs that I have come across:
http://englishseale.edublogs.org/2009/10/09/descriptive-writing-glogster-example
A wonderful tutorial to walk you through setting up your Glogster account can be found here:http://drop.io/4denpdx/asset/glogster-wtih-de-ppt
I hope you and your students enjoy glogging as much as I do!
Hello World
Well I have finally done it....this is something I have been thinking about doing for a while. I have spent the past 6 months building my PLN. Along the way I have read some amazing blogs and connected with like minded educators on Twitter. The time has come for me to take the next step in my journey with 21st Century technology...reflecting on my successes, my failures, and the attempts that land somewhere in the middle through blogging. So far so good, it was super easy to set up this blog. It took more time for me to decide on my blog title than to create the blog itself. I actually created a blog ona different site, but hated all the advertising that popped up in between my first posts. So far so good here on advertisement free blogger!
Subscribe to:
Posts (Atom)